Ostranauts ship piloting sits at the heart of every journey you make across the K-Leg system. Whether you launch from OKLG station for a short tug job, push a derelict toward a salvage lane, or hold station while a rival captain curses your parking, the bridge commands how the rest of your crew survives the day. The version 1.0 release refined Newtonian flight to feel weighty yet approachable, but it still punishes the player who treats thrusters like an arcade joystick. For a new captain, learning Ostranauts ship piloting means more than memorizing which key spins the ship — you have to read bridge instruments, manage fuel and reactor heat, and decide when to cut an OMS burn so you actually stop beside a docking collar instead of inside one. Get those fundamentals right and every other system, from salvage to trading, runs smoother, because the boat isn't fighting you anymore.
Bridge Layout and Control Stations
Every flyable vessel hands you a bridge organized by crew role. Each station performs a distinct job, and leaving a chair empty means losing a layer of control. Starter hulls follow the same layout regardless of size, which makes early Ostranauts ship piloting practice transferable to bigger ships later.
Bridge Stations Overview
| Station | Default Role | Core Function | Pilot Access |
|---|---|---|---|
| Pilot / Helmsman | Captain | Throttle, attitude, radar zoom | Always available |
| First Officer | MFD operator | Cycles multi-function displays | Always available |
| Engineer | Reactor engineer | Power, fuel, coolant routing | Always available |
| Comms / Nav | Navigator | Chart readouts, docking hails | Configurable per hull |
| Gunner (optional) | Weapons officer | Turret and missile control | Optional added slot |
The Pilot chair owns translation and rotation. The Engineer chair decides whether maneuvering thrusters get enough juice to fire at all, and the First Officer cycles the MFDs so you see velocity, attitude, ballast, and reactor load without leaving the helm. When you fly solo, you tab between stations via a crew-rotation key — slower than handing each job to a real crew member, but workable while you're still testing a hull you haven't fitted out yet. Solo pilots who want better monitoring should at minimum assign a fresh hire to engineering; the bridge crew skill tiers matter more here than in any other game loop.
MFDs and the Helmsman's HUD
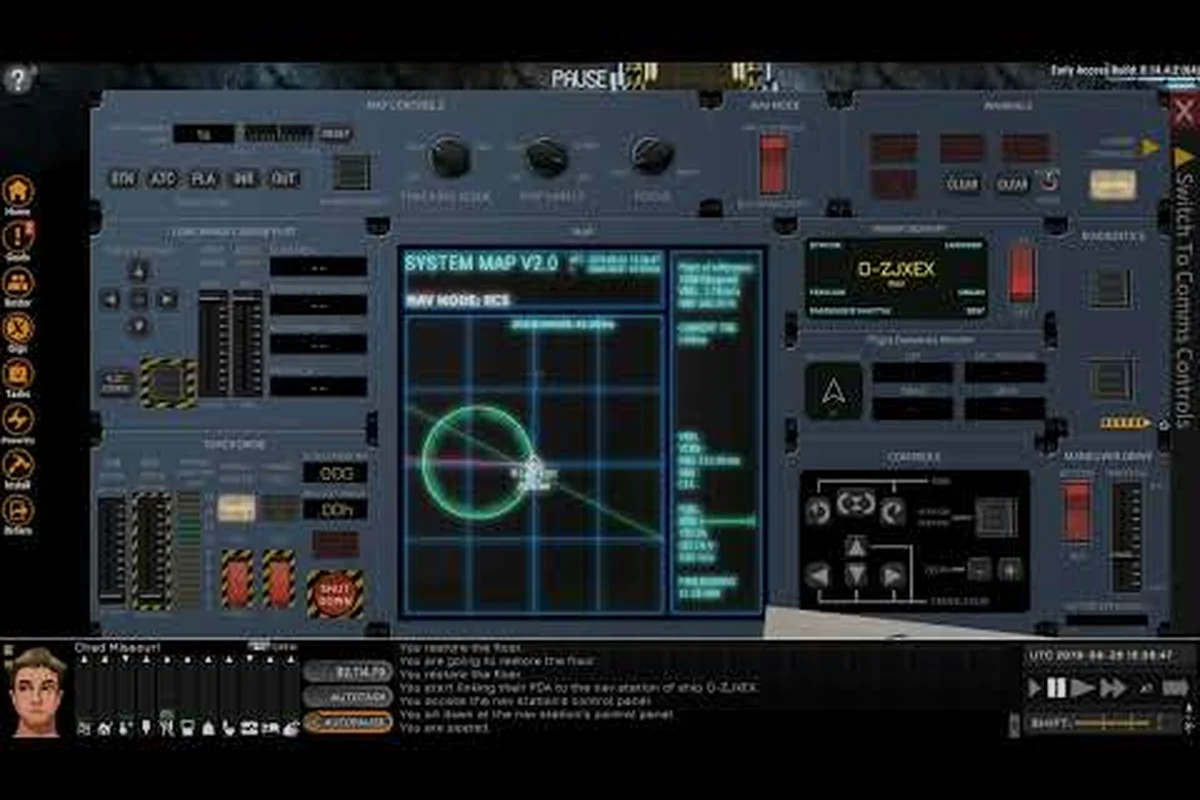
The pilot's HUD packs the entire cockpit into three rings. The velocity vector — the magenta arrow in the central pip — points where your ship is actually moving, not where the nose is aimed. The attitude indicator sits in the upper HUD showing pitch, yaw, and roll relative to the local frame. The range/bearing readout outlines whatever target you have locked. Cycled MFD pages reveal ballast status, reactor load, contact radar, and docking alignment markers, and pages can be re-bound on a per-pilot basis once you have the right consoles installed — covered in the Ostranauts ship customization walkthrough. Learning to read these four layers in one glance is the single biggest jump between «thrust forward, ship forward» and Ostranauts ship piloting as a real discipline.
Flight Physics and Maneuvering
The sim applies Newtonian motion faithfully: there is no drag, so a coasting ship keeps coasting forever, and any uncountered thrust nudges velocity forever. Pilots coming from arcade games will overcorrect, burn all their propellant, and end up drifting helplessly between stations. The fix is to plan burns as timed pulses, not held keys, and to know which thruster solves which problem.
Newton's Laws in Space
| Maneuver | Best Thruster | Why It Works | Common Mistake |
|---|---|---|---|
| Translate on X / Y / Z | RCS thrusters | Low impulse, easy to cancel | Holding for too long |
| Major velocity change | OMS / main engine | High impulse per second | Burning past target |
| Spin / rotate the hull | RCS roll/yaw/pitch | Precise torque on every face | Fighting spin with main engine |
| Slow descent or stop | Retrograde OMS burn | Cancels vector cleanly | Forgetting the retrograde flip |
RCS thrusters fire in short bursts and leave a small kick each time — perfect for fine alignment. The OMS / main engine delivers bulk translation but reacts slowly, so pilots who spam it overshoot every docking collar. The right rhythm is to fire retrograde, zero your velocity vector, then trim with RCS until the magenta arrow collapses to a dot at your target. According to community testing published on the official Ship Building wiki, heavier hulls demand longer burns but tolerate small input mistakes; lighter couriers react faster and punish lazy hands, which is why most veterans recommend a medium hauler as a training hull.
Drift, Rotation, and OMS Burns
Drift is the silent killer of careless Ostranauts ship piloting runs. Once a tug hits a salvage hulk, momentum transfers and your hull starts tumbling. You stop rotation with paired RCS pulses on opposite faces, then drag the velocity vector back to center before lighting the OMS. Skipping the rotation step is the most common reason new pilots fly past their destination in a slow spin they can't see. A useful drill: pick a buoy 5 km out, kill all rotation with eyes closed, then match velocity to zero. If you can do it inside three minutes, your bridge discipline is already ahead of the curve. Fuel cost should stay under 8% of tank on that drill.
Navigation, Charts, and Autopilot
Charts turn a free-floating vessel into a routed one. The Star Map (default M-key) is more than a route planner — it plots the current heading vector, waypoint markers, station ids, and salvage lanes that orbit OKLG. Every docking port is anchored to a numbered berth id, and clicking one pins it as the active destination, which then feeds the autopilot. New captains often miss the small range ring that previews the approach cone; toggling that ring on is the cheapest situational-awareness upgrade in the game.
Reading the Map Screen
| Chart Layer | What It Shows | When Pilots Use It |
|---|---|---|
| System map | Stations, lanes, planetary orbits | Planning long routes |
| Local map | Nearby contacts, port positions | Approach and docking |
| Contact radar | Velocities of nearby ships | Collision avoidance |
| Salvage overlay | Drifting hulks, loot tags | Tug and boarding prep |
Combine layers by clicking the toggle stack in the upper right of the chart. Pilots who keep both System map and Contact radar live during transit catch more salvage opportunities without sacrificing safety, because the radar reads contacts the system map doesn't.
Autopilot and Waypoint Systems
Autopilot in Ostranauts ship piloting is a co-pilot, not a chauffeur. You can hand it translation toward a docked target, rotation toward a saved heading, or a full burn-and-flip maneuver, but you must still monitor fuel, heat, and collision alerts. The system shines on the boring middle of a route — you'd rather read the cargo manifest than hold the throttle for twenty minutes. To set a waypoint, lock a target on the chart and press «engage nav». Autopilot rotates the ship, lights the OMS, and flips retrograde on arrival — provided you let it run uninterrupted. If a contact drifts into your cone, autopilot yanks thrust for the moment of conflict, but you'll still need manual control for tight maneuvers. Pilots looking to free up a console slot for an extra ballast readout will find the available MFD mounts detailed in the Ostranauts ship customization guide; decisions made here cascade into every later flight.
Salvage Approach Procedures
Tug runs test every layer of Ostranauts ship piloting at once. You must match rotation with a tumbling hulk, line up a tow point, and engage grapple without kissing the derelict's reactor. Community wisdom suggests cutting OMS well outside grapple range, coasting to the hulk at near-zero relative velocity, and applying final correction with RCS only. The right salvage cradle setup — covered in Ostranauts ship construction — gives you a flat panel that simplifies lock-on. Using autopilot during the burn stage and disengaging for the final grapple is the most reported success pattern on the official developer Discord channels.
Docking, Emergencies, and Pilot Safety
A clean dock is the moment of truth for any Ostranauts ship piloting student. Pilots who nail dockings on the first try usually have one habit in common: they slow down well before the interesting part begins.
Docking Port Approach
The standard sequence players report working reliably in version 1.0:
- Match rotation first, then translation. Tumbling into the dock collar is the #1 cause of hull breaches on rookie runs.
- Approach on a tangent, not directly down the port axis, then arc into the cone at low relative velocity.
- Kill the velocity vector within 50 m of the port. An OMS-into-retrograde flip is mandatory — you cannot «thrust backward» the way you would in an arcade sim.
- Hail for clearance through comms. Most ports require a station code; missing it queues you behind hauler tugs.
- RCS in, OMS off. Inside 20 m the OMS is too coarse. Switch to RCS pulses and let an autopilot dock-fine routine finish alignment if one is enabled.
Common Emergency Scenarios
Even veterans hit blackouts, fuel starvation, and stray contacts. The table below catalogues the emergencies Ostranauts ship piloting players report most often, paired with the standard community-recommended response.
| Emergency | Typical Cause | First Response | Long-Term Fix |
|---|---|---|---|
| Reactor blackout | Overdraw or coolant leak | Switch to backup battery, vent heat | Reroute reactor, repair coolant line |
| Hull breach | Collision or weapon hit | Seal compartment, suit up crew | Patch with reinforced plating |
| Loss of OMS | Fuel starvation | Switch to RCS-only flight | Refuel at the next station |
| Stray contact | Traffic or salvage drift | Radar lock, vector avoidance | Reduce speed in crowded lanes |
| Fire in engine room | Crew negligence or damage | Cut power, vent atmosphere | Replace damaged wiring |
Carrying a backup battery and a spare coolant canister in the lower-deck locker is the cheapest insurance a new pilot can buy. Real safety, though, comes from the bridge crew — assign a trained engineer and a comms officer and you will rarely see the emergencies above. Until you've built that team, fly slower, hold more fuel margin, and keep one eye on the radar at all times. The trade-off between a stripped-down courier and a heavier hauler comes down to delta-v versus survivability, and the Ostranauts ship design breakdown walks through the math for each hull class so you can pick a build that matches the routes you actually fly.
Frequently Asked Questions
What is the fastest way to learn Ostranauts ship piloting?
Spend your first session in the tutorial corridor practicing RCS pulses with OMS off. Once you can zero your velocity vector on a static buoy, you're ready for short station hops. The Getting Started wiki page walks through this exact drill.
Can I fly a ship entirely on autopilot?
You can hand autopilot long burns and standard dockings, but you must stay at the helm. Autopilot disengages the moment a contact enters the safety cone, and you'll need to take manual control for salvage grapples and tight berths. Treat it as a fatigue-reducer, not a captain replacement.
Do I need a full crew to pilot a ship?
No, but a lone pilot must tab between helmsman, engineer, and nav stations. A trained engineer dramatically improves reactor safety, which matters most during long burns. Many pilots keep a chief engineer and a comms officer as their first hires because those two roles reduce the most common emergencies.
How do I avoid running out of fuel mid-route?
Check the fuel-mass readout on the MFD before every burn. Plan each leg with a 30% reserve, refuel at OKLG between runs, and never burn OMS in short bursts unless the target is already inside the safety ring. A stripped-down courier — see the Ostranauts ship design walkthrough — carries more delta-v per ton than stock haulers.
Where can I read more about the controls and physics behind Ostranauts?
The Ostranauts Steam page links to community guides and patch notes. Wiki.ugg's Ship Building entry remains the most cited Newtonian-physics reference for new pilots in 2026.
What part of the bridge still trips you up — docking alignment, fuel budgeting, or salvage grapples? Drop your toughest run below and we'll dig into the specific inputs that fix it.